Panthavma's blog

Flexible Rendering and Lookdev Pipelines with Malt + Godot

Published : April 24, 2022

So! Since my last article on Godot Pipelines, there has been a lot of things, including the start of my PhD (on real-time non-photorealistic rendering!). One of them is the release of Malt 1.0 Preview, which is super useful for me in all kinds of ways, and today we're going to look at how to use it with Godot to quickly create rendering pipelines, and most importantly have the same rendering in both Blender and Godot !

Exemple with the Sieldver from Kronian Titans

I cannot overstate how useful it is to have both use the same rendering code. Faster iterations, less work, better results, better tools... Non-photorealistic rendering really needs that kind of flexibility as there's no standard, and by definition all renders are going to be different.

Today we're gonna set up a small two pass render pipeline like the last time to see how it's done. You can find the code here.

UPDATE November 1st 2023: Malt has got some updates which changed the interface, I've given some fixed code here but haven't updated the repo yet.

Target Render

Creating the Malt Pipeline

The main feature we're going to be interested in here is custom render pipelines, which allows us complete control over what is rendered. This is where Malt will create the buffers and basic parameters, and where we can use our OpenGL calls. Let's start by taking the Mini Pipeline as a base, and add stuff one at a time.

The main functions are as follows:

Frame Buffer Objects (FBOs) / Render Targets: This is a collection of buffers that a shader will write to. While in Godot, we can only output to one buffer, in regular rendering we can write to several. This is actually how deferred shading works: write all your parameters in a first pass to several buffer, then sample them all in a second pass to compute our final color.
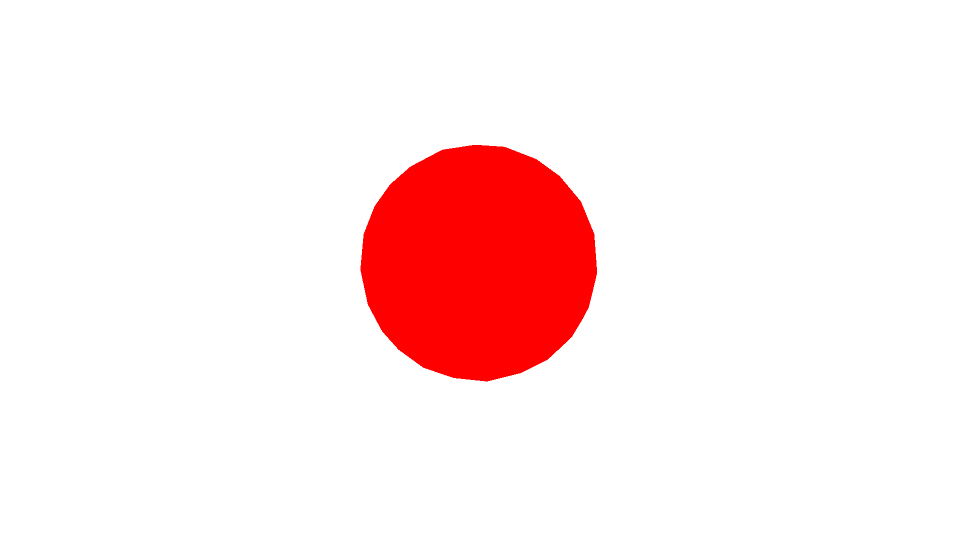
from os import path

from Malt.GL.GL import *
from Malt.GL.Mesh import Mesh
from Malt.GL.RenderTarget import RenderTarget
from Malt.GL.Shader import Shader, UBO
from Malt.GL.Texture import Texture

from Malt.Pipeline import *
from Malt.Render import Lighting

class PipelineMaltToGodot(Pipeline):
    DEFAULT_SHADER = None

    def __init__(self, plugins=[]):
        super().__init__(plugins)

        if PipelineMaltToGodot.DEFAULT_SHADER is None:
            source = '''
            #include "Common.glsl"

            #ifdef VERTEX_SHADER
            void main()
            {
                DEFAULT_VERTEX_SHADER();
            }
            #endif

            #ifdef PIXEL_SHADER
            layout (location = 0) out vec4 RESULT;
            void main()
            {
                PIXEL_SETUP_INPUT();
                RESULT = vec4(1);
            }
            #endif
            '''
            PipelineMaltToGodot.DEFAULT_SHADER = self.compile_material_from_source('mesh', source)
        self.default_shader = PipelineMaltToGodot.DEFAULT_SHADER

    def compile_material_from_source(self, material_type, source, include_paths=[]):
        return {
            'MAIN_PASS' : self.compile_shader_from_source(
                source, include_paths, ['MAIN_PASS']
            )
        }

    def setup_render_targets(self, resolution):
        self.t_pgbuffer_depth = Texture(resolution, GL_DEPTH_COMPONENT32F)
        self.t_pgbuffer = Texture(resolution, GL_RGBA32F)
        self.rt_pgbuffer = RenderTarget([self.t_pgbuffer], self.t_pgbuffer_depth)

    def do_render(self, resolution, scene, is_final_render, is_new_frame):
        shader_resources = { 'COMMON_UNIFORMS' : self.common_buffer }

        self.rt_pgbuffer.clear([(0,0,0,0)], 1)

        self.draw_scene_pass(self.rt_pgbuffer, scene.batches, 'MAIN_PASS', self.default_shader['MAIN_PASS'], shader_resources)

        return { 'COLOR' : self.t_pgbuffer}


PIPELINE = PipelineMaltToGodot

Finally, here's our mesh shader. The only thing it will do is render some data for the second pass, here by filling the red channel.

#include "Common.glsl"
#include "Lighting/Lighting.glsl"
#include "Shading/ShadingModels.glsl"

#ifdef VERTEX_SHADER
void main()
{
    DEFAULT_VERTEX_SHADER();
}
#endif


#ifdef PIXEL_SHADER
layout (location = 0) out vec4 RESULT;

void main()
{
    PIXEL_SETUP_INPUT();

    RESULT = vec4(1, 0, 0, 1);
}
#endif

Finally, set the color profile to linear in the film panel (set Display Device to None).

Target Render

Adding Lights

For now we don't have anything to compute lighting, so let's change that. As we're doing low level code, we usually need to pass each light parameter manually, but Malt has a few helpers we're going to use since we don't have anything special with the lights themselves.

The following code will do two things:

Uniform Buffer Objects (UBOs): This is the collection of the uniforms (think of them as parameters for the shader) we will send to the shader. Every shader will define what uniforms it will have, and the pipeline will set their value before rendering.

    def __init__(self, plugins=[]):
        # [...]

        # Load the lights
        self.lights_buffer = Lighting.get_lights_buffer()


    def do_render(self, resolution, scene, is_final_render, is_new_frame):
        # [...]

        # Load the lights (Sun CSM Count, Sun CSM Distribution, Sun Max Distance)
        self.lights_buffer.load(scene, 1, 1, 1, 4, 0.9, 100.0)
        shader_resources['SCENE_LIGHTS'] = self.lights_buffer

        self.draw_scene_pass(self.rt_pgbuffer, scene.batches, 'MAIN_PASS', self.default_shader['MAIN_PASS'], shader_resources)

        return { 'COLOR' : self.t_pgbuffer}

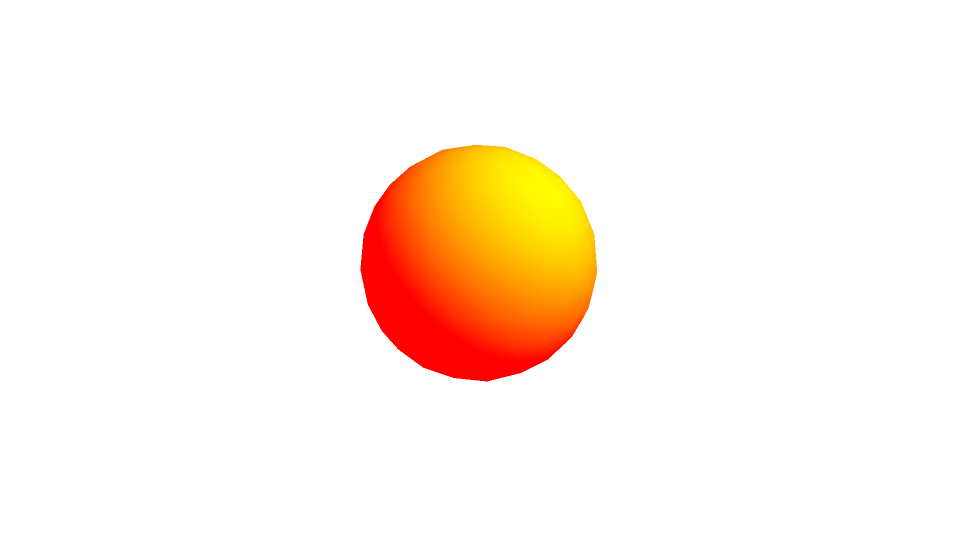
Then we update the shader to take those lights, and with it compute the lighting we will put in the green channel.

void main()
{
    PIXEL_SETUP_INPUT();

    LitSurface ls = lit_surface(IO_POSITION, IO_NORMAL, LIGHTS.lights[0], false);
    vec3 shading = diffuse_lit_surface(ls);
    float lightCoef = (0.2126*shading.r + 0.7152*shading.g + 0.0722*shading.b);

    RESULT = vec4(1, lightCoef, 0, 1);
}

Target Render

Render Targets

Next step is creating our buffers for the passes. We'll simply rename the first one and add a second, no need for the depth pass.

    def setup_render_targets(self, resolution):
        self.t_pgbuffer_depth = Texture(resolution, GL_DEPTH_COMPONENT32F)
        self.t_pgbuffer = Texture(resolution, GL_RGBA32F)
        self.rt_pgbuffer = RenderTarget([self.t_pgbuffer], self.t_pgbuffer_depth)

        self.t_secondpass = Texture(resolution, GL_RGBA32F)
        self.rt_secondpass = RenderTarget([self.t_secondpass])

Creating the second pass

Now the trickier part. To have it render correctly we will have to both register a new material for the pass in the __init__ function, and use it in the do_render function. Then, we will pass the result of the previous render to it as a uniform. Finally, we create the shader for the second pass.


    def __init__(self, plugins=[]):
        # [...]

        # Add the material to hold the second pass's shader
        self.parameters.world['Second Pass Material'] = MaterialParameter('', '.screen.glsl', 'Mesh')

    def do_render(self, resolution, scene, is_final_render, is_new_frame):
        # [...]

        self.draw_scene_pass(self.rt_pgbuffer, scene.batches, 'MAIN_PASS', self.default_shader['MAIN_PASS'], shader_resources)

        # **Second Pass**
        SecondPassMaterial = scene.world_parameters['Second Pass Material']
        if SecondPassMaterial and SecondPassMaterial.shader:
            SecondPassMaterial.shader['MAIN_PASS'].textures['samplerPGBuffer'] = self.t_pgbuffer

            self.draw_screen_pass(SecondPassMaterial.shader['MAIN_PASS'], self.rt_secondpass, shader_resources)
        else:
            return { 'COLOR' : self.t_pgbuffer}

        return { 'COLOR' : self.t_secondpass }
#include "Common.glsl"

uniform sampler2D samplerPGBuffer;
uniform vec3 litColor = vec3(1,0.2,0.2);
uniform vec3 unlitColor = vec3(0.8,0,0);
uniform vec3 backgroundColor = vec3(0.7);

#ifdef VERTEX_SHADER
void main()
{
    DEFAULT_SCREEN_VERTEX_SHADER();
}
#endif

#ifdef PIXEL_SHADER

layout (location = 0) out vec4 RESULT;
void main()
{
    PIXEL_SETUP_INPUT();

    vec4 pgbufferSample = texture(samplerPGBuffer, UV[0]);

    RESULT = vec4(mix(backgroundColor, mix(unlitColor, litColor, step(0.2, pgbufferSample.g)), pgbufferSample.r), 1);
}
#endif

Target Render

Creating the Godot Pipeline

This is what we did in the last article on Godot Pipelines. I prefer doing the tests in Malt since it's faster for prototyping and has full OpenGL support, but since Godot has its own language you should keep its limitations in mind. Oddlib has evolved a bit so I'll give the updated code here:

extends "res://oddlib-shaders/pipeline/OLSPipeline.gd"

var secondPassMaterial = preload("res://SecondPassMaterial.tres")

func Setup():
    AddPGBuffer("First Pass")
    AddParameterVPTexture("Second Pass/PG Buffer", "bufferPG", "First Pass")
shader_type spatial;

void fragment() {
    ALBEDO = vec3(0.0,0.0,0.0);
}

void light() {
    float l = DIFFUSE_LIGHT.g + (clamp(dot(NORMAL, LIGHT), 0.0, 1.0) * vec3(0.,ATTENUATION.g, 0.)).g;
    DIFFUSE_LIGHT = vec3(1.0,l,0.0);
}
shader_type canvas_item;

uniform sampler2D bufferPG : hint_black;
uniform vec3 backgroundColor = vec3(0.7,0.7,0.7);
uniform vec3 unlitColor = vec3(0.8,0.0,0.0);
uniform vec3 litColor = vec3(1.0,0.2,0.2);

void fragment() {
    vec4 samplePG = texture(bufferPG, SCREEN_UV);
    COLOR = vec4(mix(backgroundColor, mix(unlitColor, litColor, step(0.2, samplePG.g)), samplePG.r), 1.0);
}

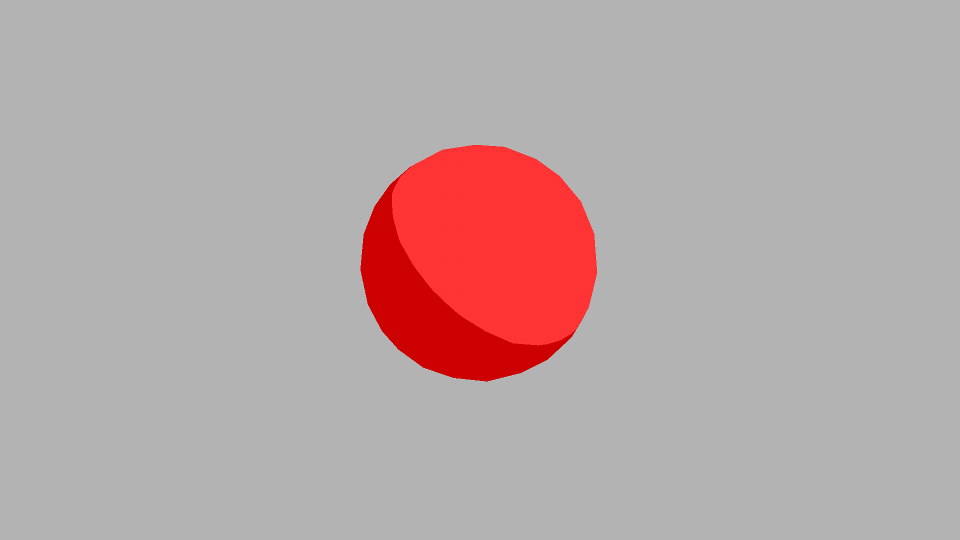
Since this shader does the same things as the GLSL shader, and the pipeline has the same ordering of passes, this gives us identical or near-identical results depending on the parameters we use (don't forget to activate the linear color profile in Blender's film panel).

Target Render

Where to go from here ?

So, now that we have seen how to set up a simple pipeline, you can apply it to your project! I think we can go even further by using the same shader for both, although that would require a preprocessor and a lot of #IFDEFs.

This has already been super useful for me, so I'll probably continue to dig on the subject. Join the discord if you want to stay up to date!

Leave me a message!


Newsletter

Enjoyed the article? Register for the newsletter to not miss the next one!